Making rock-solid connections that will hold up to harsh marine environments and keep you electrical components and electronics operating reliably for decades all boils down simply having the right stuff. Here is a 2-part breakdown of the most common wiring connections you're likely to run into and what you'll need to make it easy to do the job RIGHT.
For the record... you're going to need a heat gun for just about every electrical job you do in a boat, so I'm not going to list it over and over in every section below.
I'll also mention that I have used the electric "hair dryer" looking heat guns as well as the small gas-flame ones. I preferer the electric heat guns because for me it's way easier to control the temperature and heat the tubing and insulators just the right amount without going too far. The gas torch versions were super convenient because I you aren't fighting with an extension chord or trying to find an outlet that isn't already taken, but even after playing with all the adjustments and shielding attachments it was just too easy to screw up. After the third or fourth time I melted my heat shrink or the wire insulation I switched back to the electric heat gun and never looked back.
 |
 |
| Electric Heat Gun | Gas-Flame Heat Gun |
Ok, moving on to the specifics...
#1. Large Terminations Like Battery Cable Lugs and Trolling Motor Wiring (8 AWG to 1/0 AWG)
What you need if you want to make life easy:
- Crimpers -
 |
 |
| Premium Crimpers #8 - 4/0 AWG | What I Suggest on Amazon for 1/4 of the Price |
Since these large wire connections are almost always associated with providing the proper amount of juice to your primary modes of propulsion (e.g. your outboard motor and trolling motor) it's incredibly important that these terminations are bulletproof. The key to that is using the right size and type of crimpers, and of course terminals/lugs as well.
I had a pair of the expensive premium crimpers above as well as the $40 hydraulic crimpers off of Amazon on the right. I'll just say that I have no idea where the expensive ones are now. The hydraulic units make light work of any large cable crimping job, and you can hang the boat from your battery lugs they're crimped so tight.
- Lugs and Terminals-
I'm not going to spend a lot of time talking about these. As long as the wire size rating of the crimp or lug matches the wire you're using then it's hard to screw it up. Also, be sure you double check the post diameter for the lugs. Most wet cell lead acid and AGM batteries have 5/16" posts, and most lithium batteries have M8 bolts, but there are certainly exceptions.
 |
 |
| Terminal Lugs (8 AWG x 5/16" shown) | HD Butt Connectors (8 AWG shown) |
- Heavy Duty Wire and Cable Cutters -
I don't think I need to explain what these are for or why they're important to have when you're working with heavy gauge wiring. However, I will say that I totally use these for stripping the heavy gauge wire insulation too. Just LIGHTLY clamp the cutters where you want to strip the wire back to and slowly spin them around the cable a couple of times. After 1 or 2 passes around the cable remove the cutters and gently bend the tip of the cable back and forth. You'll see the cut you just made open up and if there is any insulation still hanging on. You can usually just nick the one or two remaining strips with a pocket knife and you're all set.
 |
| Heavy Duty Cable Cutters (22 - 2/0 AWG) |
- Adhesive Lined Heat Shrink-
Last but not least you're going to need a quality adhesive lined heat shrink tubing. These have a layer of glue inside that melts as the tubing shrinks and completely seals moisture out of your crimp. If you notice most of the lugs we carry are marine grade and have closed ends which in combination with the adhesive in the heat shrink completely prevents moisture from reaching the internal wire stranding. This is not a trivial difference either.
 |
| Marine Grade Adhesive Lined Heat Shrink Tubing |
#2. Making Smaller Wire Connections for things like Sonar Units, Pumps, Lights, Etc.
Just like with the larger cables having a quality crimping tool is the single most important part of making reliable wiring terminations. The first thing you need to be clear on when picking out the right crimper is the correct clamping jaw type, and size for the type of crimping job you're going to be doing. Since this section is going to be primarily focused on making crimp connections with wire in the 10AWG to 18AWG size range, we're going to be talking purely about crimps using adhesive-lined, heat-shrink type crimp connectors.
However, before we can get to crimping and heat shrinking anything we need to get our wires stripped back and ready to crimp. I've used every type of wire stripper out there and the type I have pictured below are by far my favorite.
- Automatic Wire Stripper Tool -

|
Ancor Automatic Stripper 10-26 AWG [702033] |
- Ratcheting Crimper Tool -
Here is a really nice angled crimper designed specifically for the heat-shrink style terminals we're going to be discussing here. Note that I've selected a "single-crimp" model here intentionally as opposed to the double-crimp option. This is due to the double-crimp models being a little to wide to cleanly crimp some of the smaller flared quick connect terminals without interfering with some part of the terminal on either side of the crimp area.

|
Ancor Angled 22 to 8 AWG Single Crimp Ratcheting Crimper [703015] |
- Crimp Terminals -
The second most important piece of the connection puzzle is the crimp terminal itself. I always use a quality adhesive-lined heat-shrink crimp like these:

|
Ancor 22-10 AWG Heat Shrink Butt Connectors - 10 Pack [300000] |
Stripping & Crimping Procedure
- Strip the ends of each wire to be joined so that there is approximately 3/8" of bare stranded wire exposed on the ends. 3/8" may be a little farther than some other examples recommend, but I like the additional length so that when I see a little exposed conductor inside the crimp I know that wire is fully inserted into the crimping area.
- Twist the exposed stranding on each wire so that it is nice and tight and there are no stray strands sticking out that would make it difficult to insert into our crimp terminal.
- Fully insert the bare stranding of the wire into the crimp terminal as far as it will go, and hold the terminal in place on the end of the wire by gently pressing on the opposite end of the terminal with your finger
- Now, using the appropriate colored crimping slot on the jaw of the crimping tool, squeeze the handle until it releases and the handle opens. If you don't squeeze it far enough to fully crimp it will not release the handle. In that case simply keep squeezing until it releases.
- Repeat this process for the other side of the crimp terminal for butt-splices, or continue to Step 6 below for single sided crimps like quick-connects, ring terminals, etc.
- Before continuing on to the shrinking process, first give the wire(s) a good tug to ensure the crimp integrity. You don't necessarily have to prove your manhood here, but in reality a solid crimp should be REALLY difficult to pull apart by hand.
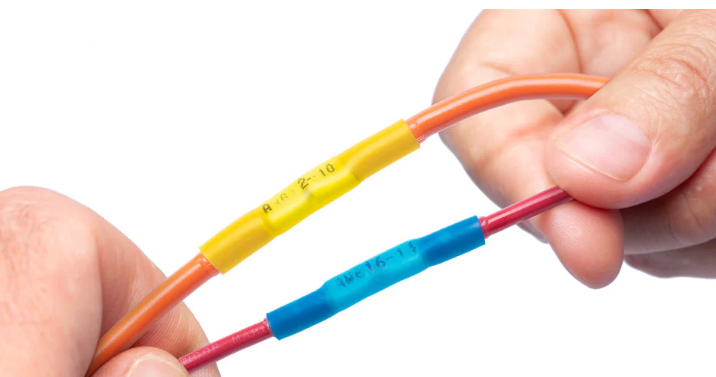
- Once the crimp integrity is confirmed we need to apply heat using our heat-gun. Be sure to rotate the connection slowly while fanning the heat from end to end to try and shrink the tubing as evenly as possible. Continue to heat the connection until you see the insulation become more notably more clear evenly on all sides, and there is evidence of the adhesive starting to squeeze out around the edge of the heat shrink.
- Let the connection cool.
That's it! If you follow these steps your connections will last for decades even in the harshest marine environments.